The New York Times has an article about selling on Etsy, "That Hobby Looks Like a Lot of Work."
QUIT your day job?
To some craft enthusiasts that is just the name of a popular blog on Etsy, the fast-growing Web site that serves as a marketplace for crafts and vintage goods.
But to Yokoo Gibran, it was an epiphany.
Ms. Gibran, who is in her 30s, had been selling her hand-knit scarves and accessories on the site for less than a year when she decided last November to quit her day job at a copy center in Atlanta. Thirteen months later, she would seem to be living the Etsy dream: running a one-woman knitwear operation, Yokoo, from her home and earning more than $140,000 a year, more than many law associates.
Jealous? How could you not be? Her hobby is her job. But consider this before you quit your day job: at the pace she’s working, she might as well be a law associate.
Read more...
Very interesting article... hmmm... I think I'll get to work!

Sunday, December 20, 2009
Etsy in the NYT
Wednesday, December 16, 2009
Aurae Light Spacers
I bought a 1/4 lb. of Aurae Light from Double Helix a few weeks ago, just to try it out. I made a small set of spacers with it: The spacers pictured above turned out nice, but there were many more I made that did not turn out well. I found the glass to be more difficult to reduce than regular Aurae. Not that it doesn't reduce, it just reduces more quickly, or it heats up and strikes to a greenish cast more readily than Aurae. I found I had to hold it way, way out in the flame, like 6-8 inches from the torch face while reducing, and not get the bead too hot.
I think that making really shiny solid spacers from reducing glass is harder than using it as decoration. There is something about the smooth, round face of a spacer bead that lends itself to uneven reduction and striking from overheating. I think Aurae Light would be perfect for raised dots, raised decorations, and under encasing (which I've tried and it looks really pretty).
It's similar to the way Dark Silver Plum works. I learned this from Amber (Naos). If you try and make a smooth round spacer bead with DSP, it often stays black and shiny and it's tricky to get the peacock hues. Yet if you make a textured bead with it, it gets the matte metallic look and the colors much more easily. Reducing glass from Double Helix seems to be the same way in a sense - it's easier to get a nice metallic shine when there's some texture in the surface.
Does it sound like I'm complaining about glass? (There is some line about a craftsman who blames his tools... hmm...) Maybe it's because I've got a head cold right now, ugh! Also I seem to have lost my knack for reducing Triton lately which really has me upset. Is it that the recipe for Triton has changed? Have I forgotten how I used to reduce it? It's really weird. It reduces to a dark grey metallic, then goes right to an over-reduced green-tinted yuck right afterwards. Where's the shiny gold I used to get?
I hope you are healthy and enjoying yourself for the holidays!
More soon :-)
Saturday, December 5, 2009
Metallic Thread Beads
I have two new sets on Etsy. This first set is a "destash" of orphaned metallic thread beads. They're various sizes and shapes and use combinations of Nyx, Elektra, Kronos and Aurae: This set is made with a base of Nyx and threads of Aurae:
 I'm waiting anxiously for the UPS lady today who is bringing a pound of Triton from ABR! They're having a sale on Double Helix glass right now.
Wednesday, December 2, 2009
Terra and Ekho Beads Destash
I have some new "destash" listings in my Etsy shop tonight, Double Helix Terra and Ekho beads encased with Aether clear:

Monday, November 30, 2009
Organic Brown and Metallic Beads
I listed this on Etsy tonight. It's a set of 9 beads with 2 that are larger than the others and could be used as a separate earring pair. To me they look like sandstone with metallic ore running through.
 I'm also going through my bowls of extra beads and making up some 'destash' listings for Etsy. I have so many extras that are perfectly good, I just never made a complete set of them, or else they're a set of the same style but mis-matched sizes. There are lots of reasons nice beads become orphans.
I put up these two destash listings today and they're now sold, but look for more in my Etsy shop during December.
These are made with ASK Blue Bahia and etched:![]() These are Ivory, not etched:
These are Ivory, not etched:![]()
Sunday, November 29, 2009
Thanksgiving
My kids had the week off from school and we went down to Scottsdale, AZ to spend Thanksgiving with family. Relatives came from Tucson, New York, Connecticut and California. My Aunt Ann threw a spectacular Thanksgiving dinner. There were 23 people at the table! Ann is the woman at the opposite end of the table. She is an amazing painter, and in the picture above she's standing in front of one of her paintings. You can see her website HERE.
We're back home in Sedona now and I'm looking forward to getting back to the torch this week.
I hope you had a nice week too!
Thursday, November 19, 2009
Those Pesky Hairs! A Photoshop Tut
Troubled by those unsightly hairs that sneak into your bead photos?
I know the story... You're sure you dusted off the bead before you took the picture - but gasp! There it is, another bead fallen victim to a bad hair day! What's a girl to do? Spend another 10 minutes re-taking the photo? It's too late to pluck with tweezers!
Relax... if you've opened the photo in your Photoshop program, just select the "Smudge Tool"!
Here is a photo of a bead that I dusted with a ridiculous amount of lint for dramatic effect: I open the photo in Photoshop and select the "Smudge Tool." I'm using Photoshop CS2 here:
 Starting with the background of the bead, I'll tackle the areas in the circles first:
How to erase the lint:
1. Select the Smudge Tool and make the tool radius small. I'm using the size "7" and the strength "100%" here.
2. With your cursor, place the Smudge Tool just to the left of but not touching the lint you want to erase.
3. Click and drag left to right across the lint to erase it, using the shortest drag distance necessary.
4. For large pieces of lint, only erase a little bit at a time, lifting and moving the Smudge Tool to the next section of lint until the whole piece is erased. This will give you a better looking smudge than if you try and erase the whole big piece of lint in one drag.
Here is the photo now with the background lint removed: Now I'm removing some of the lint from the bead surface. This part is trickier because I don't want to smudge the details of the bead:
 And here is the final outcome of the virtual lint removal:
 Not perfect by any means! But you get the idea. If this were a bead photo I wanted to use in a listing, I obviously would have first questioned the unusual level of dust in my house, then re-taken the picture. I must have spent a half-hour in Photoshop getting rid of all that lint.
I hope this helps. Have fun!
Tuesday, November 17, 2009
Beautiful Jewelry - Katinn on Etsy
Kathy the Bead Lady, or katinn on Etsy, makes the most gorgeous jewelry using Bali silver, Swarovski crystal and lampworked beads. I love this combination. Below are some of my favorites from her shop.
Monday, November 16, 2009
Colorful Metallic Beads
I listed these beads on Etsy tonight, and they've sold now, but I have to show them to you! 
One of my customers, Jill, asked me recently to make some beads with Elektra glass for her. I hadn't used Elektra in about two years. I had 3 rods collecting dust on my glass shelf because I could never get anything I really liked out of it. I tried making some simple Elektra spacers for Jill in a seafoam green color, but just couldn't do it! It wasn't working for me at all in the way that it does for some glass artists. I had to tell her that unfortunately I couldn't complete her order.
Here are the greenest spacers I could make with my Elektra, but they're really kind of blue, not the seafoam color I wanted:
In one of our last emails Jill suggested that Elektra and Aurae might look nice together, so I gave it a try. The textured colorful beads at the top are the result. I'm so amazed by them - the color is incredible I think! They are made with an Elektra base and surface texture of Aurae.
I'm headed right back to the torch to make more!
It was actually Jill who bought these beads from my shop tonight, I didn't even email her to tell her I was listing them or anything. And she had no idea that they were made using her suggestion. Thank you Jill!
One more pic of the beads:
Click on the photos to see a larger view.
:-)
Sunday, November 15, 2009
What I've Been Up To!
It's been quite a while since I last posted on my blog! I'm going to jump right in with a few photos of some beads I've made lately.
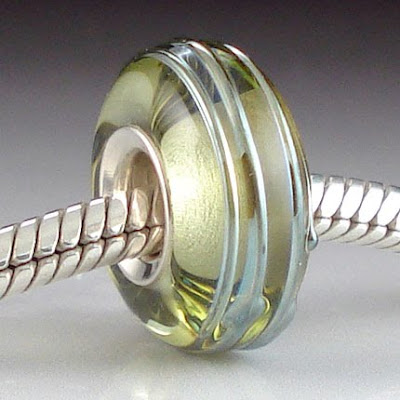
This is a silver cored bead made with Aurae glass. I gave a light reduction to an Aurae base bead before applying clear dots over the reduction and melting them in. The translucency of the glass gives the bead a pretty inner glow:
This style I really like, it's a silver cored bead made with Dark Ivory and Aurae scroll designs. Ivory and Aurae mixed together create an incredible 'crackled' look on the bead:
These next beads are made with Dark Silver Plum. They were made for a customer who wanted beads to match a DSP sculptured bird bead she bought from Jennifer Geldard. These beads mimic the eye of the bird. It was an honor to think that my beads might end up on a necklace with a Geldard bird!

If I want to play catch-up, I really have so many bead photos I could post here! The photos above are just a random sampling of some of the things I've made recently. I will be showing more of my favorites in coming posts.
So what have I been up to lately? Life! :-D
In addition to Life, I've been up to my ears in custom bead orders for at least a month. On one day alone I received 6 custom orders which is a record for me. I had to develop a system of index cards to keep it all straight. It's been a real blessing and a great opportunity to talk to some of my customers in more depth, which I love to do. However, I'm so ready to be done with the custom orders now, make beads I 'want' to make, and focus on re-stocking my Etsy shop. I've decided not to take any more custom orders until after the new year.
Now that Life and custom orders are chilling out, I hope to be writing here more often.
Enjoy your weekend!
Wednesday, September 16, 2009
Silver Glass Etsy Listings
I have two new Etsy listings tonight. The first is a set of Nyx accent beads: The silver glasses never cease to amaze me! I don't think I've ever made a set of Nyx beads that turned out so silver-y. Every day that I work with a silver glass it comes out a little different than the day before. It's almost impossible to truly duplicate a bead or set with silver glass in it.
Another case in point is the next bead, made with Triton and Kronos frit and encased with Aether clear. There's no way I could predict how the colors on this bead would turn out, and if I used the same recipe again a hundred times I'd have a hundred different beads: Lovin' it!!!
Sunday, September 13, 2009
Siver Cored Beads on Etsy!
I've been working on silver coring beads for a few weeks now. I have quite a little collection going. I love to gaze at them, polish them, put them on my Pandora bracelet. Trouble is, I love them so much I'm having a hard time letting them go. They are my babies.
:-D Lampworkers, you know what I'm talking about :-D
Yet all babies must one day venture out into the big world and find a new home and gainful employment. Such it is with my cute little silver cored beads. The separation anxiety has been a little tough, but I've finally listed a few on Etsy! Here are their photos:
Etched organic: Double Helix Kronos with Kronos frit:
 CiM Mojito with Triton (2 photos):
 CiM Slytherin and Mojito with Triton:
Have a nice Monday and happy beading :)
Tuesday, September 8, 2009
Silver Coring Beads: Sources and Supplies
If you'd like to silver-core your beads, I've put together a short list of information sources and suppliers to get you started.
There are a few good threads on the Lampwork, Etc. message board that are worth checking out. For inspiration, this thread has lots of photos of Pandora and big-hole beads:
"Let's see your Pandora style beads"
http://www.lampworketc.com/forums/showthread.php?t=80096 Tutorials
The following two LE threads written by Andrew were invaluable to me while I was trying to figure out silver-coring. I have all of the tools Andrew lists, including the polishing bits and compounds he recommends. One thing I do differently from Andrew is I cut my tubing 1/16" (or about 2mm) longer than the width of my beads, not 4mm as Andrew does. This is in part because I use the Jim Moore bead press, and the 1/16" measurement works best for me with this tool.
Andrew's excellent tutorials:
"Rivet Tutorial (Da pretty silva bit)"
http://www.lampworketc.com/forums/showthread.php?t=95388
"Polishing ( Da pretty silva bit )"
http://www.lampworketc.com/forums/showthread.php?t=96712
Supplies!
There are lots of places you could find the silver-smithing tools, but I got most of mine from Rio Grande. Rio Grande also carries the "brownies" and "greenies" polishing bits that Andrew talks about. I've found they work really well:
Brownies
Greenies
The Autosol metal polish mentioned in Andrew's polishing tut can be purchased on-line from Winterbrook Farm Antiques:
Autosol
The Autosol works great but has a petrochemical smell. I love it anyway though and I'm glad I bought it. It really cleans and gives a nice mirror finish to the silver.
photo courtesy of Ginko Designs
Sterling Silver Tubing
The one supply I found hardest to locate was the right size silver tubing to fit my beads and the Pandora bracelet. All of my prayers were answered when I found Ginko Designs Etsy shop! She has worked with a manufacturer to develop this unique size of tubing that perfectly fits the Pandora bracelet. Her shipping is fast and the tubing is high quality, and you're also supporting a fellow artist when you purchase from her shop!
Ginko Designs on Etsy
3/16" Mandrels
Another supply I had a really hard time finding was 3/16" mandrels. I don't know why this is such a rare size! I was very happy to find them finally at Arrow Springs.
Jim Moore bead press
The most helpful tool of all has been the Jim Moore bead press. I've tried hand-riveting with the punches, but the Jim Moore tool is faster and easier, especially if you're a beginner silver-smith. Here's the link to Jim Moore's bead press:
Jim Moore Bead Press
I hope this post has been helpful to you!
Have fun!
Sunday, August 30, 2009
Learning to Silver Core Beads

For the past several weeks I've been holed up in my studio, often till the wee hours of the morning, researching everything I might possibly need to know about putting silver cores in my beads and making silver bead caps. I have tables piled with gigantic Rio Grande catalogs and boxes of rusting yet resurrect-able silversmithing tools from bygone days.
Finally, last week, research done and hundreds and hundreds (and hundreds) of dollars saved for this very moment, I placed my orders and waited anxiously each day for the UPS lady to arrive.
Now my studio is happily scattered with styrofoam peanuts and shipping boxes, out of which has come polishing bits and compounds, silver tubing, silver sheet, hammers, mallets, mandrels and one very heavy and gorgeous Jim Moore bead press!
The photo at the top of this post shows the one success out of my first six attempts at silver coring a bead. Here is what remains of the other five attempts: There is definitely a learning curve to this process! And I'm not even finished learning how to make the bead caps, which is another ongoing studio adventure at the moment.
Today marked Day 4 of working with the tubing and bead press, and I finally have 5 successfully lined and polished beads which I will photograph and post here soon.
Stay tuned for my next post featuring sources and resources for everything you need to silver core and cap your beads!
Saturday, August 8, 2009
Ekho Crystals
What was that? Ekho crystals! Just listed in my Etsy shop: These have a pretty mother-of-pearl sheen.
Monday, August 3, 2009
Sparkling Mixed Metallic Set
This set of mixed metallic beads is up in my Etsy shop:
 The beads are made from Kronos, Triton, and a bit of Aether clear, all from Double Helix. I really enjoy making these mixed metallic sets because every bead is different, yet I need to make them similar enough to go together in a set. Fun! And fun to make into jewelry and wear, too! Click on the pictures to see the full-sized image.
Sunday, July 26, 2009
De-Stash Listings on Etsy
I listed a couple of de-stash groups on Etsy tonight, but right in the middle of writing this post, all the beads sold! Well, here's what you missed:
 I'm making up more destash listings, so I'll be back with another post when those are ready!
Friday, July 24, 2009
Tutorial: Gradient Background for Bead Photography
I was asked recently in an email what I use for a backdrop/background in my bead photos. The answer is simple: a white-to-black gradient printed on glossy photo paper.
I know many beadmakers already use this technique, but for those who haven't tried it yet, I've made a short tutorial on the process.
I have a Mac computer and I use Photoshop CS2. I think the Photoshop interface on a PC looks similar to the Mac version, so this tut will work for PC Photoshop users. If you don't use Photoshop, perhaps you can adapt this tutorial to the program you use for photo editing or graphics.
The instructions below include text followed by a screenshot of the step in Photoshop. Click to enlarge the images.
How to Make a Gradient Background in Photoshop
1. Create a "New Document" in Photoshop with the following attributes:
- Name: "gradient" or whatever suits you
- Width: 8 inches, Height: 10 inches
- Resolution: 200 pixels/inch
- Color Mode: Grayscale, 8 bit
- Background Contents: White
2. With your new document open, choose the Gradient Tool from the tools palette. Also, make the background color white and the foreground color black.
3. Using the Gradient Tool, click at the top of the document window and drag straight down about 2/3 of the way and let go. A gradient that fades from black at the top to white at the bottom should appear on the document.
It should look like this:
4. Save your document as a .psd or something that will preserve the high resolution. DO NOT save it as a .jpg, that is too low-res and will make an un-even, pixelated gradient when it's printed.
5. Printing the document
In the print options, under "Print Settings" choose:
- Media Type: Premium Glossy Photo Paper
- Color: Black
- Mode: Advanced
- Print Quality: Best Photo
(Or whatever the similar settings are on your software)
Here is the kind of photo paper I've been using recently. I bought it at Office Max:
A note about printing:
I have noticed that some brands of black printer ink are not truly black. It's similar to how Effetre Black glass is not really black, but a very dense transparent purple. The same must go for when ink companies try to manufacture the ever-elusive black: they have to make it a densely pigmented version of some color or colors. Because of this, my gradients sometimes turn out with a greenish or reddish cast in the "black" area. This is very frustrating. There are a few things that can be done:
- Try a different brand of black ink next time you need to change cartridges.
- Take your photos anyway with the slightly tinted background, and make the adjustments to the tint when you are doing your bead photo editing.
- Scream, lament over the expense of the wasted photo paper and ink, give up completely, and go make beads.
If anyone knows how to solve this vexing black ink problem, I'd love to hear what works.
Variations on the gradient:
- Try clicking and dragging the Gradient Tool half-way down or all the way down the document window to change the length of the gradient, which will either add more black or more white area.
- Instead of a white-to-black gradient, try white-to-green, white-to-purple, or some other color combination to make a colored background for your beads.
- Place the beads near the center of the gradient page when you are photographing them, where it is fading from white to black. Or, put them on the white part for a pure white background or on the black part for a darker background.
Care for the printed gradient:
Gradients printed like this tend to scratch and stain easily. Take care with it. Expect that you may need to print another one up every few months or so when the old one gets too many scratches.
I hope you enjoyed this tutorial. I think it's the first one I've ever made. I had fun. Good luck with your bead photography!
:)
T-218 Accent Beads
A favorite Double Helix odd lot glass of mine is T-218. I'm not sure which production glass Double Helix considers it an odd lot of, or whether it's called a "test batch," but I think of it as an odd lot of Terranova. It strikes in a very similar way, only it strikes faster. It takes only short cycles of heating and cooling to bring the amazing colors out of this glass.
I've made a simple set of accent beads from T-218, and they're available in my Etsy shop:
Here's a previous post I've written about T-218:
http://beadabundant.blogspot.com/2008/10/odd-lot-t-218s-and-triton.html
The post features some beads I made with T-218 and Triton, pictured below. For some reason I didn't get the bright colors out of the T-218 in this set, but I like its earthy tones anyway: Now I'm thinking that the reason they don't have the bright colors is because my striking skills weren't as good back then. I've found that with striking glass in general, whether it's Terranova, Luna or Terra, etc., the bead has to get VERY COOL before it goes back in the flame for striking. I let it get very cool during each cooling cycle, and for the heating cycle I twirl the bead far out in the flame (8 inches from the torch face) so the surface heats up slowly and I can keep a close eye on the progress.
Keep having fun and have a nice weekend :)
Thursday, July 23, 2009
How Many Beads in a "Set"?

I've made a poll on the right-hand side of my blog. I'm asking you the reader how many small-sized beads you like to see in a "set." I'm not talking about simple spacer beads, more like the small beads I make that are decorated with swirls or scrolls, etc., like in the photo above.
I've gotten two responses so far, and I'm amazed at the feedback. Both responses call for even numbers of beads in a set. I generally make an odd number of beads in my sets, like 7 or 9.
This question has been asked before on the Lampwork, Etc. forum, but I couldn't find the old thread (if anyone knows, I'd love the link). I'm asking you now here on my blog, because I'm curious about what jewelry makers are looking for. I don't make as much jewelry as I used to, so I'm really out of the loop when it comes to what jewelry designers like to buy. Thank you to the people that left feedback on the poll, I really appreciate it. If you haven't voted yet, please do! Or leave a comment on this post.