
Monday, October 12, 2015
20% Off Spacers SALE!
For the next two weeks I'm offering 20% OFF of all spacers in my Etsy shop. Come on down and stock up on holiday bead supplies!
Friday, September 25, 2015
New Updated Website
I've been working on a new website. Here's a screenshot of the front page:

Click the image above or here to go to my website.
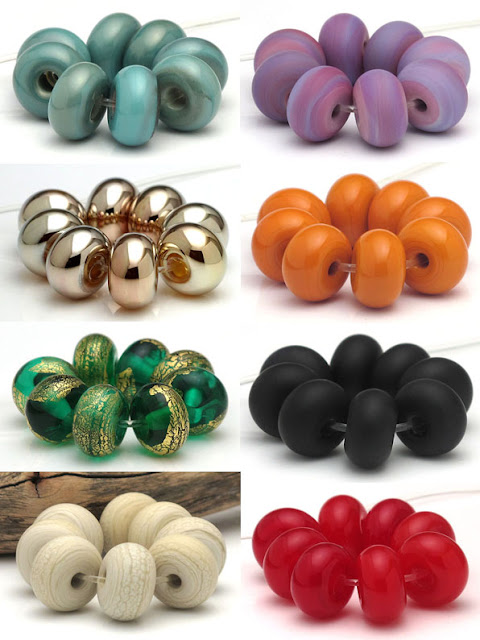
And, beads! I made this set in 2013 and recently I've been trying to duplicate it. The raised trails have to be melted in just the right amount to get the best colors.

Thursday, September 24, 2015
Buddha Cat
This is what I want to be doing right now! It's still only Thursday but I've been waiting for the weekend since Monday...

And here's my cat Tony lounging peacefully under his bodhi tree. He looks just like the buddha cat:

Wishing you a relaxing weekend!
Thursday, April 9, 2015
Sun Catcher Repair
Just as I was finishing up a sun catcher, the glass cracked...
 What to do?
Throw it away?
No, I worked too hard on it and liked it too much. Time to learn how to repair a copper foil stained glass piece!
 I removed the solder and broke out the offending glass.
 With the soldering iron and tweezers, I removed the foil that had surrounded the cracked piece. This was a tough job and I almost gave up here!
 The edge finally cleaned up, I cut and foiled a new piece.

I soldered it together again (being careful not to get the glass too hot this time) and added a ring.
Voila!

Oh yeah - the agave bloom? Guess what happened to it.


Throw it away?
No, I worked too hard on it and liked it too much. Time to learn how to repair a copper foil stained glass piece!
I soldered it together again (being careful not to get the glass too hot this time) and added a ring.
Voila!
Oh yeah - the agave bloom? Guess what happened to it.
Wednesday, March 25, 2015
Bloomin' Hairy Agave and The Latest Sun Catcher
I was out in the yard today photographing my latest stained glass sun catcher when I caught sight of this agave in bloom:
I call it a 'Hairy Agave' since it has woody thread-like hairs coming off the leaves.

I'm going to keep an eye on this and be sure to get pictures when the flowers come out.
The sun catcher:


 |
| Agave multifilifera |
 |
| Agave multifilifera bloom |
The sun catcher:
Stained glass is a real challenge to photograph. I'm happy with my progress on learning stained glass, though. My solder lines are getting better and smoother with each project.
The color of the agave bloom matches the colors of my sun catcher!
Monday, March 23, 2015
Latest Stained Glass Experiments
Practicing, practicing... trying to get smooth lines with solder.

At first I was using lead-free solder, but it gunked up my soldering iron really bad.

I had to stop making stained glass for a week while I waited for lead solder and a new soldering tip to arrive in the mail. I'm back in business now and the lead solder is much cleaner and easier to work with. This is my first project using beveled glass:

I had to stop making stained glass for a week while I waited for lead solder and a new soldering tip to arrive in the mail. I'm back in business now and the lead solder is much cleaner and easier to work with. This is my first project using beveled glass:
Thursday, March 12, 2015
Stained Glass
I love the way light shines through glass.

There is a stained glass star that hangs in the window of my studio. Being the creative day-dreamer type, I spend a lot of time gazing out the window through that star. I've often wished I could make something like that, yet for various silly reasons, I've put off learning stained glass. (Just for laughs, some of those reasons are: Hot glass is just cooler; Cold glass is sharp; Stained glass is in the Country Crafts category; I have a phobia of soldering!).
Well, no more. I just can't stand not making colorful things that hang in the window for light to shine through.
I scraped together my pennies and bought the remaining supplies I'd need to start making small stained glass projects. Luckily, I already had a Glastar grinder and a lot of beautiful colored glass from my previous foray into stained glass. This is a wind chime I made for my mom in 2013. It's my attempt to find ways to use stained glass without having to learn how to solder!


Finally my soldering supplies have arrived, I've watched hundreds of YouTube videos, and okay here we go, my first soldered stained glass thing... a pair of earrings I guess:

My second stained glass thing, a blue pendant. Really wonky, flux all over the place, hah!

Gaining courage, trying something a little more challenging:


Success!

There is a stained glass star that hangs in the window of my studio. Being the creative day-dreamer type, I spend a lot of time gazing out the window through that star. I've often wished I could make something like that, yet for various silly reasons, I've put off learning stained glass. (Just for laughs, some of those reasons are: Hot glass is just cooler; Cold glass is sharp; Stained glass is in the Country Crafts category; I have a phobia of soldering!).
Well, no more. I just can't stand not making colorful things that hang in the window for light to shine through.
I scraped together my pennies and bought the remaining supplies I'd need to start making small stained glass projects. Luckily, I already had a Glastar grinder and a lot of beautiful colored glass from my previous foray into stained glass. This is a wind chime I made for my mom in 2013. It's my attempt to find ways to use stained glass without having to learn how to solder!
Finally my soldering supplies have arrived, I've watched hundreds of YouTube videos, and okay here we go, my first soldered stained glass thing... a pair of earrings I guess:
My second stained glass thing, a blue pendant. Really wonky, flux all over the place, hah!
Gaining courage, trying something a little more challenging:
Success!
Subscribe to:
Posts (Atom)