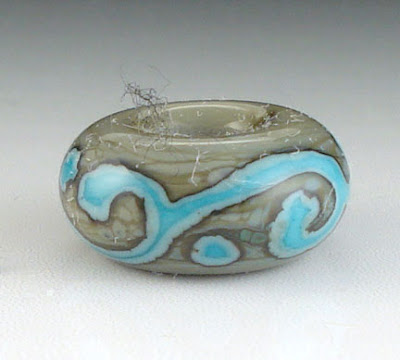
Troubled by those unsightly hairs that sneak into your bead photos?
I know the story... You're sure you dusted off the bead before you took the picture - but gasp! There it is, another bead fallen victim to a bad hair day! What's a girl to do? Spend another 10 minutes re-taking the photo? It's too late to pluck with tweezers!
Relax... if you've opened the photo in your Photoshop program, just select the "Smudge Tool"!
Here is a photo of a bead that I dusted with a ridiculous amount of lint for dramatic effect: I open the photo in Photoshop and select the "Smudge Tool." I'm using Photoshop CS2 here:
 Starting with the background of the bead, I'll tackle the areas in the circles first:
How to erase the lint:
1. Select the Smudge Tool and make the tool radius small. I'm using the size "7" and the strength "100%" here.
2. With your cursor, place the Smudge Tool just to the left of but not touching the lint you want to erase.
3. Click and drag left to right across the lint to erase it, using the shortest drag distance necessary.
4. For large pieces of lint, only erase a little bit at a time, lifting and moving the Smudge Tool to the next section of lint until the whole piece is erased. This will give you a better looking smudge than if you try and erase the whole big piece of lint in one drag.
Here is the photo now with the background lint removed: Now I'm removing some of the lint from the bead surface. This part is trickier because I don't want to smudge the details of the bead:
 And here is the final outcome of the virtual lint removal:
 Not perfect by any means! But you get the idea. If this were a bead photo I wanted to use in a listing, I obviously would have first questioned the unusual level of dust in my house, then re-taken the picture. I must have spent a half-hour in Photoshop getting rid of all that lint.
I hope this helps. Have fun!
Thursday, November 19, 2009
Those Pesky Hairs! A Photoshop Tut
Subscribe to:
Post Comments (Atom)

3 comments:
Thanks for the tut! It's great to have those tools in a pinch!
I LOVE you! This is SO what I need - I'm always getting those pesky hairs (blame it on my cat) that seem to appear after I've scrupulously dusted the beads. Thanks for sharing it - very very helpful!
Cindy
Thanks for your comments Cindy and rosebud, I'm glad I could help!
Post a Comment