One of my favorite earth tone glasses is Canyon de Chelly from CiM. It reacts in interesting ways with other glass colors. Here are some examples of beads I've made with Canyon de Chelly:
Canyon de Chelly base with ASK Caramel Apple scrolls, etched
Canyon de Chelly and Effetre Copper Green, etched
One of my favorites - Canyon de Chelly base with Double Helix Psyche scrolls
This might be my favorite set ever with CdC. The base is Copper Green and silver foil, the scrolls are CdC :) The beads are etched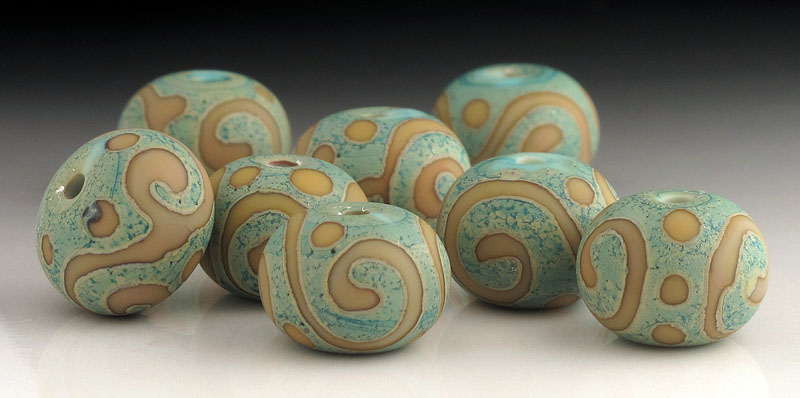
This silver-cored bead has a Canyon de Chelly base with Psyche "flowers" I made from a striped CdC/Psyche latticino
Here's a set made with the Psyche flowers
So, there's a gallery of my favorite Canyon de Chelly beads to date! There are so many other glasses I haven't tried CdC with, but if I find some great new combos I'll share them with you here.
Hint: If you work with Psyche and Canyon de Chelly together, give the Psyche a couple rounds of reducing/oxidizing, getting it metallic, then erasing the metallic shine. This will develop more colors.
:)
Have fun on the 4th!
Love ya beautiful bead peeps!
P.S. Soon I'm moving my blog to my website. I'll let you know when that happens. I really don't want to leave the glass community here on the Blogger blogs though, so I'm still going to keep this blog open and post here too, to some degree, I'm not sure how it will all work yet!

Sunday, July 3, 2011
Beads with Canyon de Chelly Glass
Friday, March 19, 2010
Sterling Silver Dust
A customer asked me to make a set of beads for her, based on a style I made more than a year ago. I wasn't sure I could remember how they were done, but luckily I did, and here they are:
 The base is Kronos and the swirls are sterling silver dust. The beads are encased with Aether clear.
I first tried silver dust because I was looking for some other way to add silver to my beads besides wire, mesh or foil. Silver dust can be bought, but I made my own by taking a rough file to a piece of silver sheet and making a little pile on my marver. I was going to use fine silver, but I didn't have any fine sheet or bezel wire. The only fine silver I have is 28g wire. Too fine to file. I suppose I could have cut it up into tiny chips - another style idea. But the only silver sheet I had on hand was sterling, so that's what I used.
After making a Kronos base bead, I rolled it in the dust like I would with frit or enamel powder. I used a Kronos stringer to twist the line of dust into swirls. Then I reduced and encased with clear.
Here's another set I made for the same order. These are Double Helix odd lot TE-362 and Vetrofond Odd Olive, encased with clear:
 The customer wanted them to be 15mm, and the sizes to be uniform. I was very happy I managed to make most of them 15.5mm, with some at about 16mm. Whew! :-D
I keep a brass micrometer - or whatever you call those things, that we use to measure bead sizes - beside my torch, opened up to 15mm or whatever size I'm working on. Since it's brass I can put the hot/warm bead right between the brass openings and get an accurate measurement as I'm making it.
Do you have a way of measuring bead sizes while you're at the torch, or what methods do you use to make your beads come out all the same size?
Thursday, November 19, 2009
Those Pesky Hairs! A Photoshop Tut
Troubled by those unsightly hairs that sneak into your bead photos?
I know the story... You're sure you dusted off the bead before you took the picture - but gasp! There it is, another bead fallen victim to a bad hair day! What's a girl to do? Spend another 10 minutes re-taking the photo? It's too late to pluck with tweezers!
Relax... if you've opened the photo in your Photoshop program, just select the "Smudge Tool"!
Here is a photo of a bead that I dusted with a ridiculous amount of lint for dramatic effect: I open the photo in Photoshop and select the "Smudge Tool." I'm using Photoshop CS2 here:
 Starting with the background of the bead, I'll tackle the areas in the circles first:
How to erase the lint:
1. Select the Smudge Tool and make the tool radius small. I'm using the size "7" and the strength "100%" here.
2. With your cursor, place the Smudge Tool just to the left of but not touching the lint you want to erase.
3. Click and drag left to right across the lint to erase it, using the shortest drag distance necessary.
4. For large pieces of lint, only erase a little bit at a time, lifting and moving the Smudge Tool to the next section of lint until the whole piece is erased. This will give you a better looking smudge than if you try and erase the whole big piece of lint in one drag.
Here is the photo now with the background lint removed: Now I'm removing some of the lint from the bead surface. This part is trickier because I don't want to smudge the details of the bead:
 And here is the final outcome of the virtual lint removal:
 Not perfect by any means! But you get the idea. If this were a bead photo I wanted to use in a listing, I obviously would have first questioned the unusual level of dust in my house, then re-taken the picture. I must have spent a half-hour in Photoshop getting rid of all that lint.
I hope this helps. Have fun!
Friday, July 24, 2009
Tutorial: Gradient Background for Bead Photography
I was asked recently in an email what I use for a backdrop/background in my bead photos. The answer is simple: a white-to-black gradient printed on glossy photo paper.
I know many beadmakers already use this technique, but for those who haven't tried it yet, I've made a short tutorial on the process.
I have a Mac computer and I use Photoshop CS2. I think the Photoshop interface on a PC looks similar to the Mac version, so this tut will work for PC Photoshop users. If you don't use Photoshop, perhaps you can adapt this tutorial to the program you use for photo editing or graphics.
The instructions below include text followed by a screenshot of the step in Photoshop. Click to enlarge the images.
How to Make a Gradient Background in Photoshop
1. Create a "New Document" in Photoshop with the following attributes:
- Name: "gradient" or whatever suits you
- Width: 8 inches, Height: 10 inches
- Resolution: 200 pixels/inch
- Color Mode: Grayscale, 8 bit
- Background Contents: White
2. With your new document open, choose the Gradient Tool from the tools palette. Also, make the background color white and the foreground color black.
3. Using the Gradient Tool, click at the top of the document window and drag straight down about 2/3 of the way and let go. A gradient that fades from black at the top to white at the bottom should appear on the document.
It should look like this:
4. Save your document as a .psd or something that will preserve the high resolution. DO NOT save it as a .jpg, that is too low-res and will make an un-even, pixelated gradient when it's printed.
5. Printing the document
In the print options, under "Print Settings" choose:
- Media Type: Premium Glossy Photo Paper
- Color: Black
- Mode: Advanced
- Print Quality: Best Photo
(Or whatever the similar settings are on your software)
Here is the kind of photo paper I've been using recently. I bought it at Office Max:
A note about printing:
I have noticed that some brands of black printer ink are not truly black. It's similar to how Effetre Black glass is not really black, but a very dense transparent purple. The same must go for when ink companies try to manufacture the ever-elusive black: they have to make it a densely pigmented version of some color or colors. Because of this, my gradients sometimes turn out with a greenish or reddish cast in the "black" area. This is very frustrating. There are a few things that can be done:
- Try a different brand of black ink next time you need to change cartridges.
- Take your photos anyway with the slightly tinted background, and make the adjustments to the tint when you are doing your bead photo editing.
- Scream, lament over the expense of the wasted photo paper and ink, give up completely, and go make beads.
If anyone knows how to solve this vexing black ink problem, I'd love to hear what works.
Variations on the gradient:
- Try clicking and dragging the Gradient Tool half-way down or all the way down the document window to change the length of the gradient, which will either add more black or more white area.
- Instead of a white-to-black gradient, try white-to-green, white-to-purple, or some other color combination to make a colored background for your beads.
- Place the beads near the center of the gradient page when you are photographing them, where it is fading from white to black. Or, put them on the white part for a pure white background or on the black part for a darker background.
Care for the printed gradient:
Gradients printed like this tend to scratch and stain easily. Take care with it. Expect that you may need to print another one up every few months or so when the old one gets too many scratches.
I hope you enjoyed this tutorial. I think it's the first one I've ever made. I had fun. Good luck with your bead photography!
:)
T-218 Accent Beads
A favorite Double Helix odd lot glass of mine is T-218. I'm not sure which production glass Double Helix considers it an odd lot of, or whether it's called a "test batch," but I think of it as an odd lot of Terranova. It strikes in a very similar way, only it strikes faster. It takes only short cycles of heating and cooling to bring the amazing colors out of this glass.
I've made a simple set of accent beads from T-218, and they're available in my Etsy shop:
Here's a previous post I've written about T-218:
http://beadabundant.blogspot.com/2008/10/odd-lot-t-218s-and-triton.html
The post features some beads I made with T-218 and Triton, pictured below. For some reason I didn't get the bright colors out of the T-218 in this set, but I like its earthy tones anyway: Now I'm thinking that the reason they don't have the bright colors is because my striking skills weren't as good back then. I've found that with striking glass in general, whether it's Terranova, Luna or Terra, etc., the bead has to get VERY COOL before it goes back in the flame for striking. I let it get very cool during each cooling cycle, and for the heating cycle I twirl the bead far out in the flame (8 inches from the torch face) so the surface heats up slowly and I can keep a close eye on the progress.
Keep having fun and have a nice weekend :)
Wednesday, December 3, 2008
Shards, Pt. 1
I've finally made some shards! Here is my first attempt, a Dark Silver Plum bulb, slightly collapsed! This is my most recent shard bulb, Triton Odd(r). This one turned out better:
 My boyfriend Steve came up with a great way to break the bulb. First put it into the coffee can to cool. Then, hold the blowpipe straight up and down with the bulb resting on the bottom of the can and tap gently on the end of the blowpipe with a piece of wood. It breaks the bulb nicely and it's easier than trying to crack it with a hammer or some metal tool. Here are some of the shards Steve got from breaking it that way:
 Emboldened by Joe of Avenue Beads' shard techniques, I broke the shards up the rest of the way with my bare hands. So much easier than trying to wield a tool to crack off small pieces! And no, it never cut my hands.
Stay tuned for "Shards, Part 2" where I'll post photos of beads made with these Triton Odd(r) shards.
Saturday, November 8, 2008
Stringer Pullers
There are lots of ways to pull stringers. I used to grab the blob of molten glass with my tweezers and pull, but that was only occasionally successful since the glass usually slipped out of the tweezers, drooped down to the bench and gave me a very curvy stringer. My preferred method now is to melt two rods of the same color together into a blob and pull. However, when I don't have a second rod of the same color handy, I reach for my trusty "stringer pullers": They start out as a short of one of the stiffer 104 c.o.e. colors, usually clear (visible in the upper left corner of the photo), which I use as a punty to grab the molten glass blob. Then I just continue to use that clear punty as a stringer puller time and time again. It's fun to see the history of what colors I've used. The stringer pullers stay on my bench for years, sometimes breaking, but I just pick up the biggest piece and keep using it as a stringer puller.
The stringer pullers are so colorful now, they're inspiring me towards some bead design but I can't quite figure out how exactly to translate their random colorful-ness into beads.
Wednesday, October 15, 2008
Packaging Make-Over
In addition to my new logo, the way cool Moo cards I just got and the matching stickers that are on the way, some other aspects of my image are getting an update. No, not a new wrinkle cream - it's these hand-decorated slide boxes that are now going out to some of my customers: They are decorated using a technique an artist friend of mine shared with me almost 20 years ago. I've always wanted to try it and finally got around to it. I'm a major procrastinator!
To start with, I got some plain white slide boxes from PaperMart.com. Then I tore up different colored and patterned tissue paper into little pieces. I used an Elmer's spray mount to put glue on one side of each piece of tissue, then quickly laid them on the box. The wet spray mount makes the tissue papers meld together in a nice way. Then I let the boxes dry for at least 24 hours... however, I'm finding that some of the spray mount that leaks through is still tacky after more than a week in the dry Arizona heat. No good. I've tried attaching the tissue with a glue stick, and it works, but I don't get the bleed-through effect like I do with the wet spray mount. Some of the good, dry boxes have gone out to customers but I need to find a better way to make them now.
A small set of beads fits nicely inside the box, looking very chic wrapped in matching tissue paper. The Mini Moo cards also fit perfectly inside.
I got inspiration for this packaging make-over from a post I read on Patty Lakinsmith's blog. Neither Patty nor I are big fans of plastic and non-biodegradable packaging, and don't like sending it to our customers who then have to throw this brand new plastic away - or hopefully find a way to re-use it.
I want to send my customers something that they do not have to throw away, like an attractive and possibly reusable gift box. If they can't reuse it, they can recycle it or throw it onto their compost pile and it will biodegrade. So far I've done away with little zip-loc bags for my merchandise, but I haven't found a good alternative to the bubble wrap and padded envelopes I ship in. The overall idea is to redesign my packaging to be more earth-friendly, reusable and attractive.
Payton Jett of GreenGlassCafe packages her beads in muslin bags which she stamps with her logo. I really like the muslin bag idea, it's my second choice after the slide boxes.
The boxes can be time-consuming, but I love making them. They're a great creative outlet for me, something artistic to do besides lampworking.
Sunday, October 12, 2008
Etched Cubes
Here's a set I've just finished and posted in my Etsy shop: These beads were made with a base of black, then rolled in Terra coarse frit. After striking the Terra just until dark brown, I formed each bead into a cube. This process took a little while and the heating and cooling struck the Terra the rest of the way.
The next day I etched the beads in an acid etch solution. Terra doesn't etch very easily, so only the black glass etched and the Terra stayed shiny!
I've been teaching myself how to make a cube shape for a few months now. It's kind of tricky! I've found that parallel mashers don't help me very much, I just flatten the sides with my hand-held marver. PPP!
Thursday, September 18, 2008
Musings on the Mysteries of Pandora
Fellow lampworker and blogger Sue shared her experience with Pandora in a comment on my last post. Thanks, Sue! Here's her comment:
"They turned out really dark, probably because they were in there for a while. I guess I have to use it last before I start the soak and ramp down. I put it over steel gray trans. and amber trans. and it turned out yuck! So, I guess plain or over opaque, and do them last instead of first...we'll see. Looks like you are the MASTER of pandora!!!!"
(I don't know about the "master of pandora" part! :-D )
I think the transparent amber is reacting with the Pandora to make that yucky color. Is that what you mean by yuck - they turned out dark-yuck? Like you said, try making plain Pandora beads or Pandora over clear, black or white. Something neutral and un-reactive.
When I put each test bead in the kiln, I write down the time so I know how long each bead annealed. The order of striking color goes magenta, purple, blue, green, yellow, opaque red [Edited to add: Double Helix Glassworks says "As it strikes it will go Amber - Ruby - Purple - Green - Blue - Opaque Red"]. If my beads were to turn out dark brick red, they may have spent too long in the kiln. Generally, my beads lighten up the longer they spend in the kiln. A short anneal will give dark purple, and a longer anneal will add in light blue, green and yellow streaks.
Another trick to bringing the color out of Pandora is to really smoosh up the glass. If I'm making a big bead and I have room to twist the glass up a little, I'll do that. How I usually start is I heat a blob of Pandora on the end of the rod, mash it with my mashers, twist it around, then re-heat it into a blob; or, I will heat a blob and then squish it down into a cold brass bead press, then re-introduce it to the heat and make it into a round blob again. When I do either of these things, tiny light-colored spider-webbed lines form on the surface of the blob. I think these spider-webs are the silver grains in the glass activating and getting ready to develop into different colors. After I see a lot of "spider webs" on the glass blob, I will apply it to the mandrel and make the bead. Sometimes I twist the rod as I'm laying the glass down, too.
If a bead is coming out of the kiln so light that it's a pale *poop* color, chances are it never struck properly to begin with. Or maybe it over-struck? I don't know for sure. A bead has to at least get the magenta or purple color first before it will lighten through the blue/green sequence. Why a Pandora bead turns out pale poop-colored is still a mystery to me.
Good luck everyone and I look forward to hearing more of your experiences. Thank you so much for sharing, Sue!
Monday, September 15, 2008
Re-Striking Pandora in the Kiln
I tried my experiment of re-striking the pale Pandora beads in the kiln (see my previous post). It kind of worked! 'Kind of' because only two out of the three beads got more color.
The beads told me that they would have preferred to be struck properly during the first go-round in the kiln to get the best color, yet they patiently endured a second hot night in the kiln and did their best to make the colors I wanted.
Here are the three pale beads from yesterday: and here they are today:
 I could have put them in the same order to make it easier to see, but the bead on the left in the first picture is the same bead as the one on the right in the second picture. That's the one that didn't get color. The other two got more blues and purples and very closely match the colorful five beads that struck properly the first night.
Also, when I re-struck the three beads in the second kiln run, I raised the temperature from a 940(F.) garage to a 950 garage and anneal. I let them sit in the kiln for 8 hours at 950. I thought all of them would re-strike, but two out of three ain't bad.
My verdict is that it's better to get the beads to strike right the first time, and if one attempts a re-strike, don't bank on the results. Maybe it's just because these beads are encased. Exposed Pandora probably re-strikes easier. I must say I'm happy with my two out of three though, because it's like taking what would have been an orphan bead and making it into a good bead!
Everyone has a different kiln and kiln environment, so my advice might not be worth a thing to you! Your best bet is to try Pandora and see what works best for you. And, if you end up hating Pandora and you can't get it to do a thing, don't throw it at the wall - sell it to me!!!
Good luck everyone!
Sunday, September 14, 2008
Encasing Pandora
I made a slew of encased Pandora beads yesterday. The photo shows all of the beads in the basic order they were made, starting from the beads on the right which were made first and the beads on the left which were made last. The first five beads (on the right) spent 7 hours in the kiln, and the three beads on the left spent 5 hours in the kiln before ramping down. You can see the color difference: Maybe encased, especially heavily encased beads, need to stay in the kiln a little longer than unencased beads. I think if these beads were made unencased, all of the beads would have dark purple and blue color.
In my last post, you can see two encased beads that were annealed for only 4 hours and got great color. Yet the beads on the left (above) annealed for 5 hours and got not much color. What's up with that? I think it's because the beads above have a much heavier encasing than my previous encased Pandora test beads.
I read a post this morning on the Lampwork, Etc. message board written by a beadmaker who got great color on her encased Pandora beads, though she only annealed them for a short time in the kiln. Ugh, I'm so jealous!!! Her kiln temp might be higher than mine, which I've heard is part of the "secret."
I'm taking my three pale Pandora beads and putting them back in the cold kiln right now. I will ramp my kiln up and leave them in there to anneal for another full cycle tonight. Hopefully they will change color, wouldn't that be cool?!
Saturday, September 13, 2008
Double Helix Pandora
A new crop of Double Helix odd lot glasses has arrived!
I've had the chance to play with a few of them. One of my favorites so far is not an odd lot glass, it's their new color, Pandora: Here are my first test beads:
 From left to right, the first two beads are plain spacers. They turned out a nice, vivid but dark purple and blue. The third bead is Pandora swirled over Triton, the fourth bead is Pandora swirled over CiM's Canyon de Chelly, and the fifth and sixth beads are Pandora spacers encased in clear.
With small beads like spacers, I think the color is darker and more limited in spectrum, possibly because there is not much of a cool/hot temperature variance in the small amount of glass to encourage the development of a broad range of color. I think large or sculptural beads will have more variety of color than the dark purple and blue I got in my small beads.
Encasing, however, works great with the small beads. In addition to blue and purple, I also got red, green and yellow. The encasing lightened up the color a little and extended the spectrum.
If you're a lampworker and are wondering about how to use Pandora, I garaged these beads at 940 for 4-6 hours and annealed at 950 for one hour. That is my regular annealing schedule. I formed the beads without any special heating, striking, cooling or reducing. I just shaped them and put them in the kiln as though I were making an Effetre bead.
When the glass goes into the kiln it looks transparent green, maybe with some opaque light green streaks. There is no color on the beads at all other than green. All the color striking happens during the hours it spends in the kiln. When I took my Pandora beads out of the kiln in the morning, I was totally amazed at the color that had bloomed. It was so easy!
Now, back to the torch to make some more Pandora beads!
Sunday, September 7, 2008
Luna and Triton Beads
I finally figured out how to get some color from Luna2! By super-heating the glass at first, then cooling (a lot), then gently heating in the back of the flame a few times, I got some beautiful purple and blue colors. Much better than the washed-out brown I usually get.
I made these beads by putting some Triton down on the mandrel, then wrapping a large blob of Luna over that. I love how the Triton makes the beads look like they have metallic end caps. They're in my Etsy shop at the moment:
Friday, September 5, 2008
YouTube Lampworking Demos
YouTube has a lot of good beadmaking and lampworking demos. This is one of my favorites, by Kerry Bogert:
Edit: Thanks to frostfire for their comment on this post. Here is the direct link to the list of YouTube lampworking videos that they are talking about: Click Here
Saturday, August 30, 2008
Encased and Shiny Triton
These two sets were in my Etsy shop recently. The first is encased Triton with shiny Triton scroll designs on the outside: To make the core of these beads, I started with a small Triton bead and added a few dots of Kronos, then dots of clear, then more dots of Triton. This gave the core an organic, textured look. Then I reduced it and wrapped a large blob of clear around it. When I melted the clear down, it stretched out the Triton designs underneath. It's difficult to see the true beauty of these beads in a photo. In this photo, you can see the layers a little more clearly:
 Here is the second set, some Triton rondelles that got a nice pink color:
Friday, May 23, 2008
DH Odd: T-114 (Ivory Luster)
Here are some beads made of plain T-114.
You can see some luster on the sides. I burned off most of the luster in an oxidizing flame so the colors would show:


RH-169, RH-193 cont.

The base is DSP with a little bit of silver foil, and the RH-169 is spiraled on top. After applying the RH-169 I heated the bead to dripping hot, then cooled, heated again, cooled, etc. for a few rounds.
While I was working it, the bead never appeared to get any color besides the regular olive green. I put it away into the kiln with a little tear in my eye because this glass still wasn't doing anything at all for me!
Soon after that I turned my kiln to the annealing cycle, so this bead was made at the end of the day... I figured less chance of it soaking a long time and kiln striking to coral.
When I opened the kiln this morning, I was completely surprised to see the purple and magenta colors on this bead! They weren't there when I put the bead into the kiln. I have absolutely no idea what happened!
I hope I can repeat whatever it was!
Wednesday, May 21, 2008
DH Odds: RH-169, RH-193
There is another RH odd-lot called RH-193, which has given me similar results in the flame. I can't seem to pull any color out of these glasses besides brick red and green - but I love the colors and the organic look anyway!

I was hoping for some purple colors similar to the photos from the DH website:
-169+300.jpg)
-193+300.jpg)
This glass obviously has potential but I haven't gotten there yet. Any blue/purple color in the RH glasses seems to disappear when the glass is re-heated. When I first wind on the glass, I do get some dark browns like what you see with other striking glasses (Terra, Khaos, etc). I let the bead cool, then re-introduce it to the flame for shaping and striking. Sometimes with a gentle re-heat, I see some blue color in this glass, but on the second re-heat the blue is gone and I'm left with red and green.
In this close-up photo you can see that one of the dots has some slight color:
 I was hoping that by encasing the dots quickly and not re-heating much, I could get some colors.
I have more photos of other test beads I'll post soon!
Meanwhile, back to the torch for more PPP!
Wednesday, April 2, 2008
New Bead Style!

If you're a lampworker: I made these by creating an encased triangle bead, then heating each end and letting gravity (and a tiny bit of marvering) stretch it down the mandrel. They take an incredibly long time to make. Just coaxing the glass down the mandrel takes me about 35-45 minutes.
These beads are a real skill challenge for me. I usually make small beads that only use one or two colors. I wanted to expand my horizons, so I tried making an encased triangle bead but accidentally stretched it down the mandrel too far. I really liked the look of it though, so I just kept going and voila, a new style!
Okay enough blabbing. Here are some more photos. None of these beads are for sale yet because I can't let let them go!


If you're interested in what clear I used, some of these beads have CiM clear and some have Vetrofond Crystal Clear. With both clears, I got some scumming and some bubbles. The pictures show it up more than you can actually see in "real life." It's hard to find a clear that stands up to very long working times.
I found that the CiM clear was a little stiffer than the Vetro, so ultimately I went with the Vetro because it melts over the base bead more quickly. The whole secret/challenge to these beads is getting the encasing all the way to the end so the colors don't leak out and bloom across the outside surface.
Hope you enjoyed the eye candy!